The Ultimate Spring Lawn Care & Upkeep Guide
Picture stepping outside onto your lawn, the cool grass brushing your feet while the fresh, green scent of a newly cut yard fills the air. We believe every homeowner deserves a vibrant, healthy green space. That's why we created this essential guide.
Think of this as your personal roadmap. We'll provide expert tips on how winter affects your turf and practical advice for maintaining cool- and warm-season grasses. For region-specific tips, consult local extension resources or experts to suit your unique conditions.
Spring Lawn Care Schedule
A seasonal lawn care schedule simplifies spring maintenance. But remember to adjust tasks based on climate and soil temperatures. Here's a quick monthly overview of the details.
| Month | Primary Focus | Key Tasks | Regional Notes |
|---|---|---|---|
| Early Spring (March) | Preparation & Cleanup | Mower maintenance, debris removal, soil assessment | Cool-season zones: Begin as soil thaws. Warm-season zones: Start earlier in South. |
| Mid-Spring (April) | Growth & Nourishment | Fertilization, weed prevention, first mows | Warm-season lawns: Prime fertilizing time. Cool-season: Focus on weed control. |
| Late Spring (May) | Maintenance & Monitoring | Regular mowing, watering adjustment, pest watch | All zones in active growth. Increase watering as temperatures rise. |
Early Spring (March) Tasks
Service your mower and sharpen the blade. Clear away winter debris like leaves, branches, and matted grass so sunlight reaches and warms the soil faster. Light raking removes thatch, prevents matted grass from dying off, and helps lawns recover from snow mold.
This is also an appropriate time to apply crabgrass pre-emergent, such as Prodiamine. You can also apply dithiopyr; although we recommend a second application several weeks later because it leaches more easily through the soil. A second application of dithiopyr can prolong the product's window of effectiveness and provide some control over crabgrass that's beginning to emerge. Both Prodiamine and dithiopyr are generally considered safe for children and pets once they have dried completely after application, but always check the product label for specific instructions.
For an eco-friendlier approach, corn gluten meal is often marketed as natural pre-emergent weed control, but there is ongoing debate about how it actually works. Some believe it suppresses weeds by inhibiting root development at germination, while others argue that its main benefit comes from the nitrogen it provides, which helps turf grow thicker and outcompete weeds.
A multi-year study conducted at the University of Massachusetts compared corn gluten meal to several organic and synthetic fertilizers applied at equal nitrogen rates and found that all fertilized plots—including those without corn gluten—showed similar levels of crabgrass control. This suggests that much of corn gluten's effectiveness may come from improved turf growth and density rather than true herbicidal action. While corn gluten is considered an organic option, it must be applied at high rates that are considered "environmentally irresponsible" and is significantly more expensive than traditional pre-emergent products, making it less practical for treating large areas.
Mid-Spring (April) Tasks
April brings active lawn growth. Apply fertilizer and your first crabgrass pre-emergent if you haven't yet—Prodiamine in mid-March to very early April, otherwise use dithiopyr, which offers a broader application window and some post-emergent control up to the first tiller stage (5 leaves). Spot-treat weeds as they appear.
Begin mowing, setting the blade high at 3-3.5 inches. Cut only one-third of the grass blade at a time. Mowing more than one-third off at once will cause growth to slow as it puts more resources into the leaf blade to help it recover.
Late Spring (May) Tasks
Mow weekly, sharpen your mower's blade, and alternate mowing patterns to prevent soil compaction.
As the weather warms up, monitor how much water your lawn naturally receives via rain, and turn on irrigation. Water in the early morning, deeply and infrequently, which means less frequent but more thorough sessions.
Watch for signs of pests or disease. Chinch bugs and fungal issues can emerge in late spring; however, it's likely easier to notice activity in early summer when they're a bit more mature. Catching problems early makes them much easier to manage.
Follow this spring lawn care schedule for best results—start now for a resilient, summer-ready lawn.
Understanding Your Lawn's Needs in the Spring
Every lawn is different. Learning what your lawn needs is key to recovery and guides all your decisions, from feeding to mowing.
Assessing Winter Damage
Winter is tough on lawns. Start by walking your lawn and looking for signs of stress. Check for compacted soil and matted grass.
Any small bare patches are common and require attention. If you're unsure what might have happened to your lawn, the University of Massachusetts lawn diagnostic guide can help. For example, if your lawn is brown, it doesn't necessarily mean anything is wrong with it. It might just be a cool-season grass that thrives in mid-spring but goes dormant in very high and low temperatures.
Looking at blade texture can offer clues about your grass type. Fine, soft blades are often associated with fine fescues and perennial ryegrass, while wider, tougher blades are more common in tall fescue and some bluegrass varieties. Warm season grasses like bermudagrass and zoysia can also vary in texture, so blade width alone isn't a definitive way to tell them apart.
Also, observe the growth pattern: dense, upright growth suggests a cool-season grass, whereas a spreading or horizontal pattern typically indicates a warm-season grass.
Identifying Your Grass Type
Are you caring for cool season grasses like Kentucky Bluegrass, Fescue, or Ryegrass? Or warm-season varieties like Bermudagrass, Zoysia, or St. Augustine?
The difference is huge. Cool-season grasses grow in spring and fall. Warm-season grasses grow when it's warmer. Your grass type affects feeding, mowing, and watering.
Regional Considerations Across the US
Where you live affects how your grass grows. Local weather affects how you treat your lawn. What works in Atlanta might not work in Detroit.
The US is divided into three turf zones:
- Northern Zone: Cool-season grasses (Michigan, New York, Minnesota)
- Southern Zone: Warm-season grasses (Georgia, Texas, Florida)
- Transition Zone: Both cool and warm-season grasses (Missouri, Virginia, Kansas)
Early Spring Lawn Preparation
The following steps are among the most important lawn maintenance tips. This advice can help prevent problems before they start and promote vigorous, healthy growth.
Clearing Winter Debris
Your first task is to thoroughly clean up your yard. Winter leaves behind branches, matted leaves, and clutter that block sunlight and may harbor mold or pests. We recommend using a sturdy leaf rake or blower. Remove everything from the surface. Don't just focus on the obvious piles. Check along fences, under trees, and in corners where debris collects.
Raking and Dethatching
Next, vigorously rake your lawn. This does more than just clean it. It helps dethatch the lawn by pulling up dead grass stems and roots (thatch) at the soil level. Some thatch helps retain water, but too much thatch blocks vital nutrients and water from reaching the roots. Use a spring-tine rake until you see more green grass than brown. Dethatcher tines for ride-on mowers are also available.
Testing Soil pH and Composition
One of the smartest investments you can make is a simple soil test. It tells you exactly what's happening beneath the surface. You'll learn your soil's pH level and which nutrients are deficient.
Most grasses thrive in slightly acidic soil (pH 6.0 to 7.0), which is typically the case in most Northeast lawns. If your pH is off, nutrients become "locked" in the soil and unavailable to your grass, no matter how much you fertilize.
| Soil Test Result | What It Means | Recommended Action |
|---|---|---|
| pH below 6.0 (Too Acidic) | Phosphorus becomes less available. Aluminum can become soluble and damage roots. Microbial activity slows. | Apply lime based on soil-test rates to raise pH gradually. |
| pH 6.0 - 7.0 (Ideal Range) | Maximum nutrient availability and healthy root activity for cool-season turf. | Maintain with regular, balanced care. |
| pH above 7.0 (Too Alkaline) | Iron and manganese become unavailable, causing yellowing (chlorosis) even when nutrients are present. | Use iron treatments or acidifying fertilizers. Elemental sulfur only if soil test recommends it. Adjusting soil pH often requires several months, and sulfur is most effective when applied to warm, moist soil conditions that support microbial activity, which helps transform it into sulfuric acid. |
| Low Nitrogen (N) | Pale green color, slow growth, thin turf. | Apply a nitrogen-based fertilizer in spring or early summer. |
| Low Phosphorus (P) | Weak root development and poor seedling establishment. | Use a starter fertilizer only if seeding or soil test confirms deficiency. |
Testing is a core lawn maintenance tip that saves you money on unnecessary products. You may be able to buy do-it-yourself (DIY) soil test kits at a garden store. If not, send a soil sample to your local cooperative extension office (a local expert group connected to a university) for a detailed report.
By clearing, raking, and testing, you prepare your lawn for a fresh start. You're now ready to feed, seed, and mow with confidence.
Addressing Common Lawn Problems
Even with the best care, lawns can emerge from winter looking thin, patchy, or stressed. Cold temperatures, snow and ice cover, desiccation, and frozen soil all take a toll on turf, making early-spring problems like weeds, bare spots, and poor color common. The key is understanding what your lawn is telling you and taking the right steps early, before small issues turn into season-long problems.
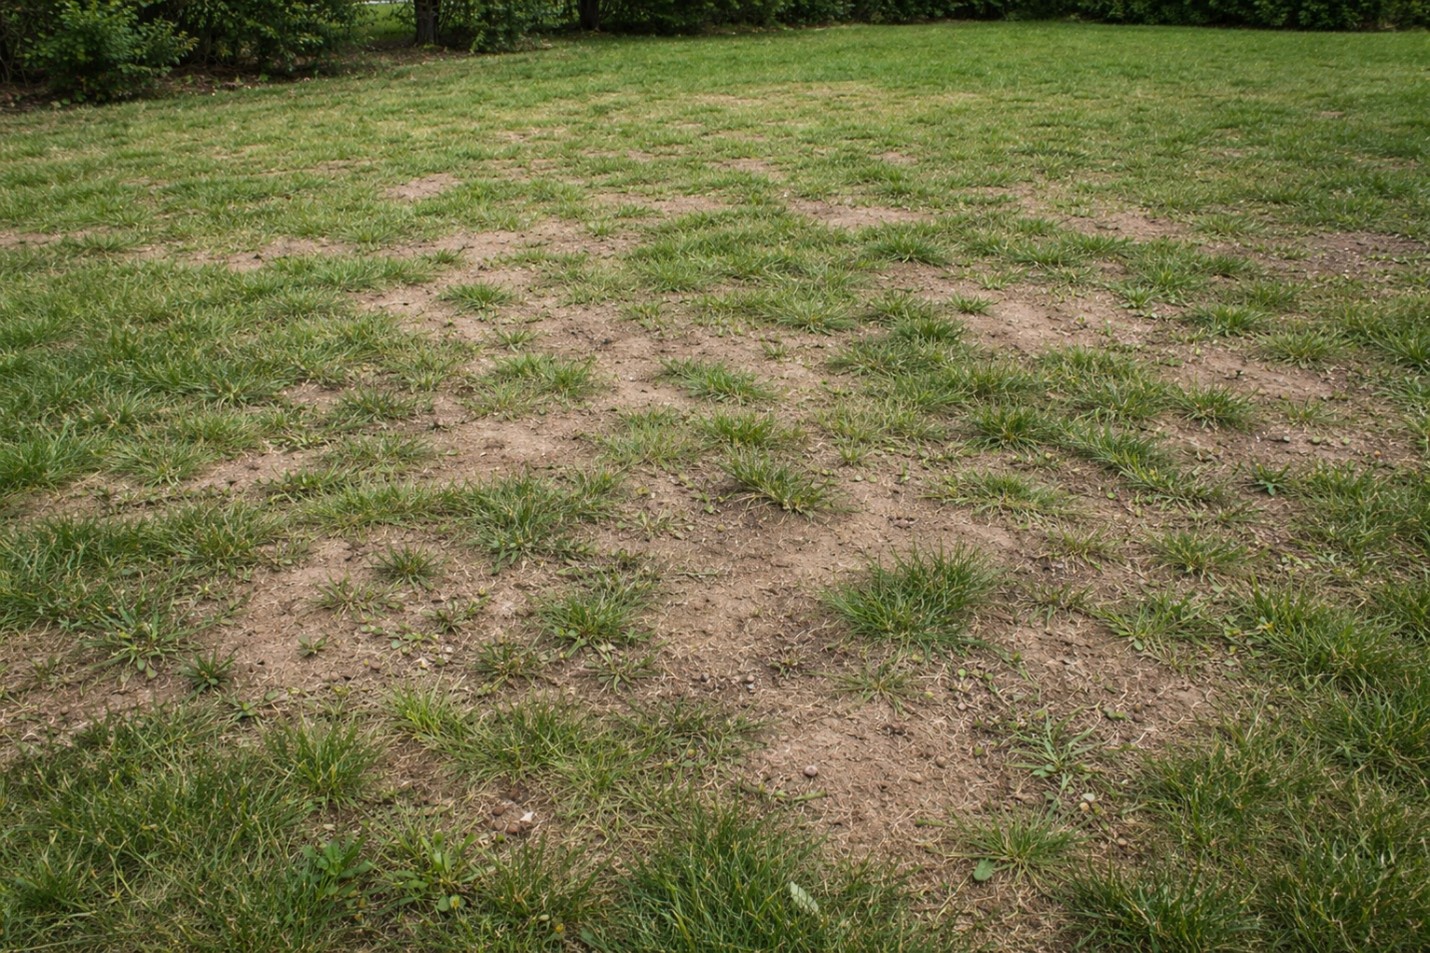
Figure 1: Aerate and overseed bare spots in the fall
Dealing with Bare Patches
Bare spots are common after winter, especially in areas affected by snow mold, foot traffic, plow damage, shade, or general thinning. As the lawn starts growing again in spring, these weak areas often become much more noticeable.
Small bare or thin spots can sometimes fill back in on their own as the surrounding grass spreads with proper mowing, fertilization, and watering.
For larger bare spots or areas that are very bare, overseeding is the best approach. Lightly rake the soil to loosen the surface, spread a grass seed that matches your existing turf, and gently press it into the soil so it makes good seed-to-soil contact. Keep the area consistently moist for 10–14 days while the seed establishes. Aerating first and then overseeding is another option.
For widespread thinning or full-lawn renovations, late summer through early fall is the ideal window. Weed pressure is lower, soil temperatures are still warm, and cooler weather allows new grass to build strong roots before winter—leading to a thicker, healthier lawn the following spring.
In the image above, for example, the lawn is very spotty. We would recommend waiting until late summer to early fall in the Northeast to heavily overseed this lawn. That timing provides warmer soil temperatures for faster germination, less weed competition, and cooler air that reduces stress on new seedlings.
Managing Lawn Diseases
Fungal diseases can pop up as temperatures rise and conditions get wetter. Snow mold and brown patch are common. Catching them early stops them from spreading.
Make sure there's good airflow by trimming trees and foliage. Water in the early morning so the grass dries by mid-morning. The exact time will depend on your location and quickly you're able to irrigate each zone in your yard with the required amount of water.
Avoid applying too much nitrogen in early spring, as it can exacerbate disease conditions. Addressing these factors can alleviate many issues without resorting to fungicides. Healthy lawns do a better job of fighting off diseases than turf that's stressed.
Controlling Spring Pests
As the soil warms up, pests start to feed. It's important to know which pest you're dealing with before treating it. Two of the most common pests you'll deal with in the Northeast are grubs and chinch bugs. Others include army worms, which are more common in the southern United States.
Grub damage is one of the most common — and most misunderstood — lawn problems. Many homeowners apply the wrong product at the wrong time and see little or no improvement, even though they "treated" their lawn. That's because some products are designed to prevent grubs from ever hatching, while others are meant to kill grubs that are already feeding.
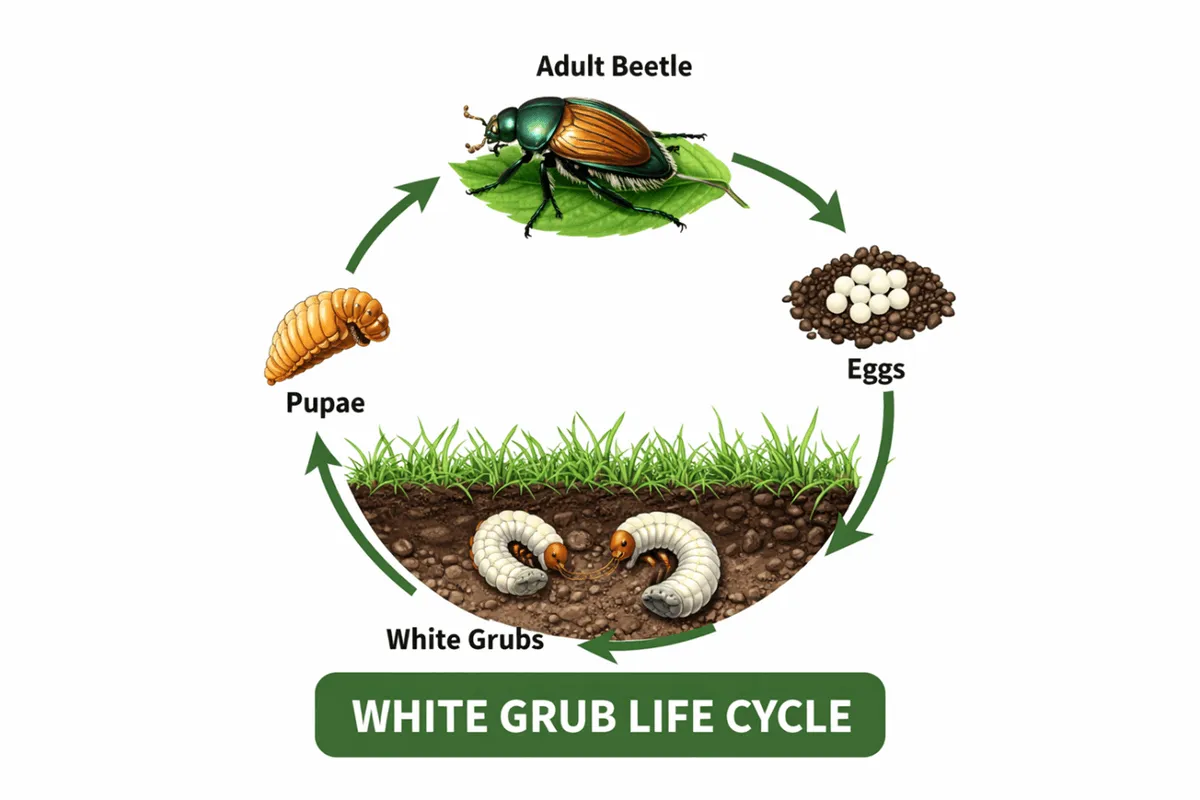
Figure 2: The life cycle of a white grub
The chart below shows the most common grub control products, their active ingredients, and whether they work as a preventative, a curative, or both — so you can choose the right solution based on what's happening in your lawn right now.
Grub Control: What Works and When
| Product | Active Ingredient | Type | Works as a Preventative? | Works on Existing Grubs? |
|---|---|---|---|---|
| Dylox | Trichlorfon | Curative | No | Yes – Very Effective |
| Sevin Grub Control | Carbaryl | Curative | No | Yes |
| GrubEx | Chlorantraniliprole | Preventative | Yes | No |
| Acelepryn | Chlorantraniliprole | Preventative | Yes | No |
| Merit | Imidacloprid | Preventative | Yes | No |
| Arena / Aloft | Clothianidin | Preventative (with some curative) | Yes | Limited |
Keep in mind that once grubs have reached their full size, usually by mid-September, curative treatments may only provide upwards of 50% population reduction. By spring, it may be less. Only spot-treat infested areas unless the entire lawn is infected. This is considered, by those in the turf industry, an "Integrated Pest Management" best practice. Overusing pesticides can cause future insect generations to develop resistance to the products, making them less effective.
Chinch bugs are a common cause of yellowing and thinning turf, especially during hot, dry weather. The challenge is that different products work in very different ways — some are designed to prevent infestations from developing, while others are meant to quickly knock down bugs that are already feeding.
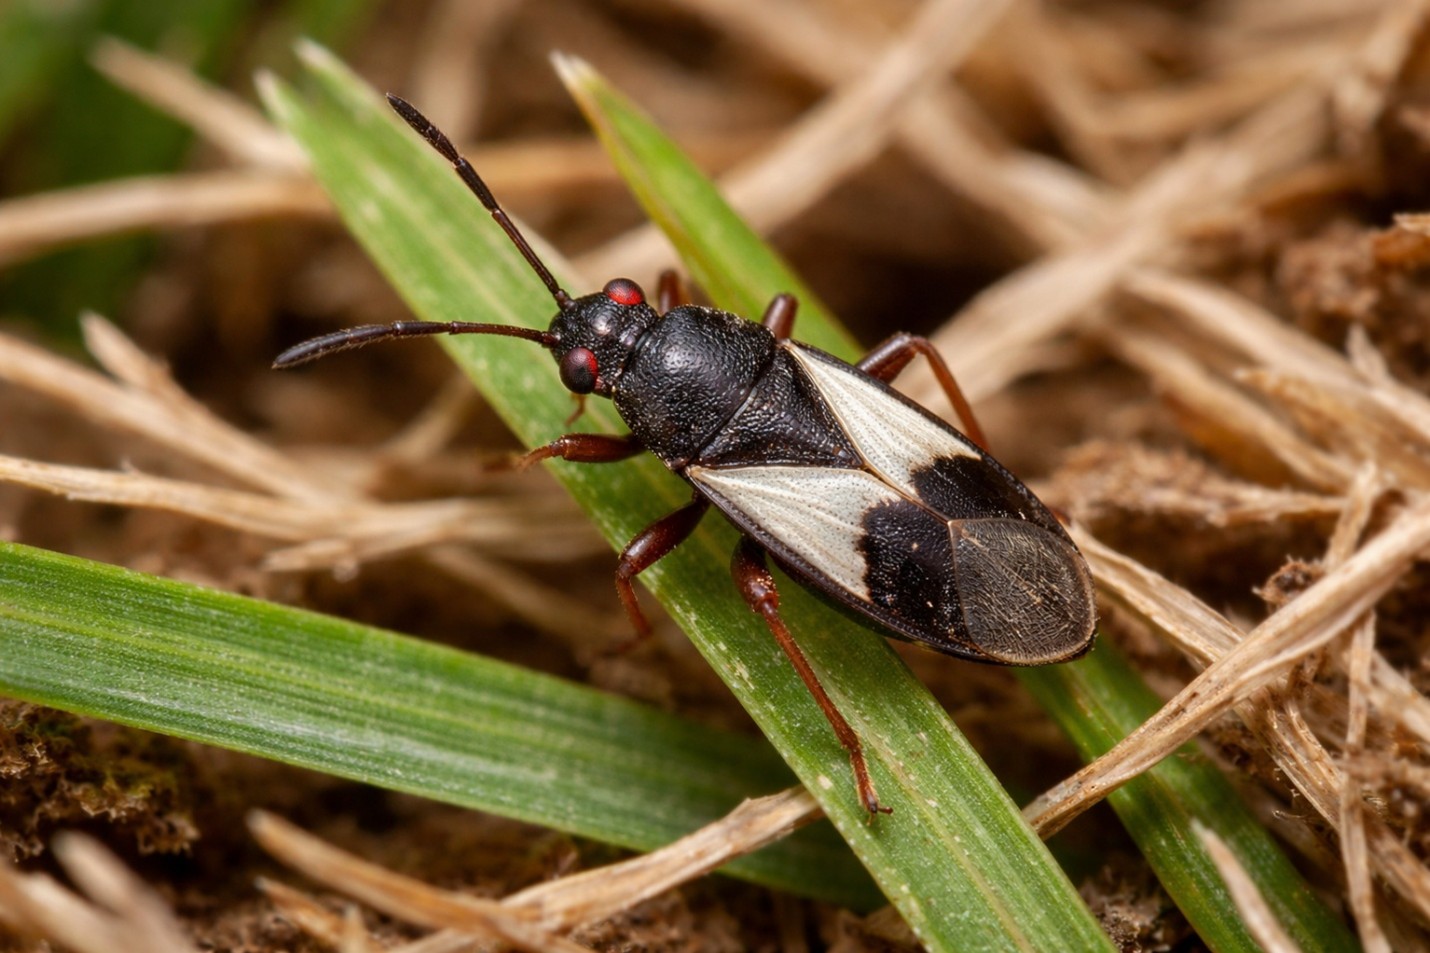
Figure 3: Image of adult chinch bug
The chart below compares the most common chinch bug control products, their active ingredients, and how effective they are for both preventative and curative treatment, so you can choose the right option based on what's happening in your lawn.
Chinch Bug Control: Preventative vs Curative
| Product | Active Ingredient | Type | Works as a Preventative? | Works on Active Bugs? |
|---|---|---|---|---|
| Talstar / Bifen | Bifenthrin | Curative | Yes (short-term) | Yes – Very Effective |
| Sevin (New Formula) | Zeta-cypermethrin | Curative | Yes (short-term) | Yes – Fast Knockdown |
| Merit | Imidacloprid | Preventative | Yes – Excellent | Limited (slow) |
| Acelepryn | Chlorantraniliprole | Preventative | Yes – Best | No (suppression only) |
| Arena | Clothianidin | Combo | Yes – Excellent | Yes – Very Effective |
Spring Fertilization Strategy
A proper spring lawn fertilization plan replenishes nutrients lost over winter and encourages deeper root growth. We'll guide you through choosing products, perfecting timing, and selecting between organic and synthetic approaches.
Choosing the Right Spring Fertilizer
The numbers on the fertilizer bag show its nutrient content. Nitrogen (N) promotes green, leafy growth above the ground. Phosphorus (P) helps roots grow strong. Potassium (K) supports the overall health of the plant and helps it withstand stress, such as heat or drought. Many experts recommend specific products based on the region.
| Fertilizer Type | N-P-K Ratio | Best For | Key Benefit |
|---|---|---|---|
| Spring Starter | 20-27-5 | New Lawns & Overseeding | High phosphorus for root establishment |
| Weed & Feed | 28-0-3 | Lawns with weed pressure | Combines fertilization with weed control |
| All-Purpose Slow-Release | 19-0-6 | Consistent, long-term feeding | Reduces risk of burn and feeds for weeks |
Application Timing and Methods
Timing is critical. If you have Kentucky bluegrass or other cool-season grasses, plan to fertilize for the first time in March or April. For Bermuda and other warm-season varieties, it's best to wait until April to begin fertilizing.
A second feeding 6-8 weeks later maintains momentum. For application, a broadcast spreader provides the easiest way to apply even coverage. Always calibrate your equipment and apply it on a calm day to prevent drift.
Organic fertilizers release nutrients gradually and feed soil biology over time, making them well suited for long-term soil improvement and steady turf growth. Synthetic fertilizers deliver nutrients in a more precise and immediately available form, which allows for faster green-up and tighter control over growth patterns.
Most lawn care companies choose one approach and build their entire program around it, rather than mixing the two, because each requires different application rates, timing, and expectations.
Identifying Common Spring Weeds
Spring weeds compete with your lawn for nutrients, sunlight, and water. Here are three common culprits:
Dandelions feature bright yellow flowers and long roots. Clover forms low, spreading mats across your yard. Crabgrass is often the most troublesome—it begins small but quickly overtakes your grass.
By learning about crabgrass biology, you can improve your weed control strategies and achieve better results.
| Weed Name | Key Identification Features | Best Control Method |
|---|---|---|
| Dandelion | Bright yellow flower, deep taproot, jagged leaves in a basal rosette. | Spot treatment with post-emergent herbicide or manual removal of the entire root. |
| Clover | Three-leaf clusters (sometimes four), low-growing, forms dense patches. | Apply a broadleaf weed control product. Improving soil nitrogen can also help grass outcompete it. Avoid seed blends that have weeds. |
| Crabgrass | Light green, coarse texture, spreads outward from a central point (prostrate growth). | Pre-emergent herbicide applied in early spring before seeds germinate. |
Crabgrass Pre-Emergent Application
Timing is everything when using crabgrass pre-emergent herbicides. These products create a soil barrier that kills crabgrass right as it begins to emerge. Apply in early spring, when soil stays near 55°F for several days.
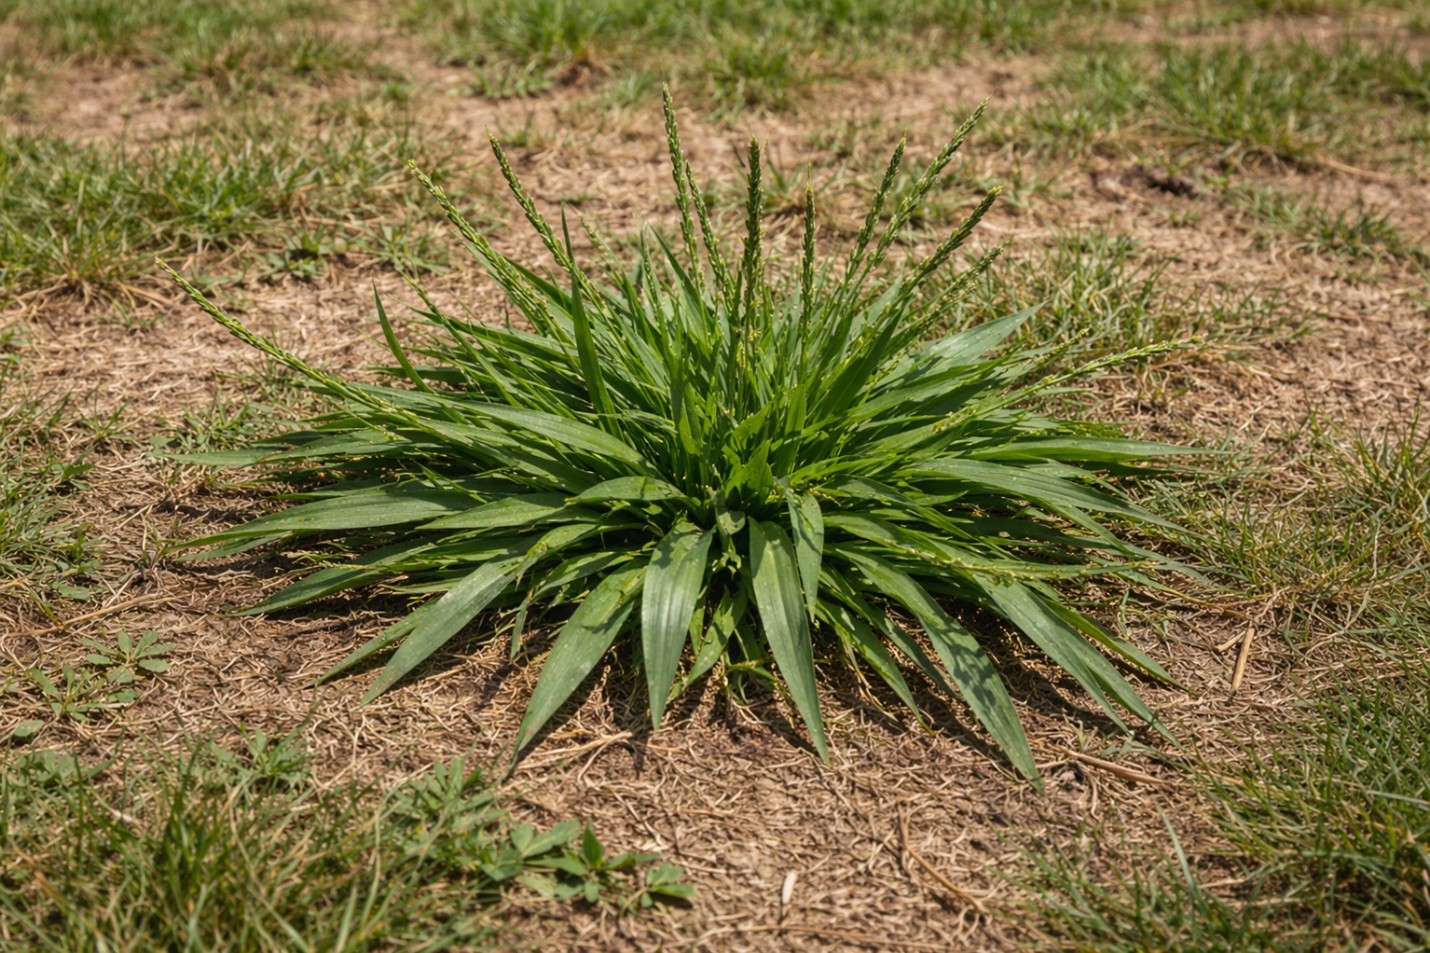
Figure 4: Large crabgrass
Use can also use the blooming of forsythia as your natural cue—'yellow blooms equal barrier time.' Applying too early can cause the herbicide to break down before weeds start growing, and applying too late can mean crabgrass seeds are already germinating. Many lawn pros also use this natural indicator to help time applications and sometimes follow up with a second, lighter treatment later in spring to extend protection. For exact timing, check guides like this one on when to apply crabgrass pre-emergent herbicides.
Remember, crabgrass pre-emergent herbicides won't kill crabgrass plants beyond the first tiller stage. For those, you need to apply a post-emergent herbicide. By correctly timing your applications, you save time and effort later.
When to Start Mowing Your Lawn in the Spring
When should you start mowing your lawn in the spring? Wait until the grass is actively growing and is about one-third taller than its ideal height. This usually happens when soil temperatures hit 50-55°F for cool-season grasses or 60-65°F for warm-season ones.
Mowing too early can harm new growth. Waiting too long lets weeds grow and may force you to cut off more than one-third of the blade at once. We'll discuss why it's important for you to follow the one-third rule when mowing in the next section.
Ideal Grass Height for First Cut
For the first cut, aim for around 3 inches. Cool-season grasses like Kentucky bluegrass and fescue do well at 3-4 inches year-round until the last cut. Warm-season grasses like Bermuda and Zoysia prefer 2-2.5 inches of water. On the last cut of the year, mow cool-season turf around 2-2.5 inches to prevent matting over the winter.
Never cut more than one-third of the grass blade at once. If your grass grew to 4 inches over winter, cut it down to around 2.75 inches first. This rule helps prevent shock and promotes thicker turf.
| Grass Type | First Mow Timing | Ideal Height | Key Consideration |
|---|---|---|---|
| Cool-Season (Fescue, Bluegrass) | After debris removal, soil ~50°F | 3 inches | Taller height shades roots, conserves moisture |
| Warm-Season (Bermuda, Zoysia) | Early spring, soil ~60°F | 2-2.5 inches | Lower height promotes lateral growth |
| Transition Zone Mixes | Watch for consistent growth | 2.5-3 inches | Adjust based on dominant grass type |
Mowing Frequency Guidelines
Maintain a consistent mowing schedule. In spring, that's probably every 5–7 days; as growth slows, that might be every 7–10 days. How often you mow will depend on how quickly your lawn grows. Regular mowing prevents stress and keeps your lawn thick and attractive.
Proper Mowing Techniques
Keep your mower blades sharp. Dull blades tear grass, which can lead to disease. Sharpen blades at least once a season for clean cuts.
Change your mowing pattern regularly to avoid compacting the soil and grass from leaning over. Mow only when turf is dry to ensure even cuts and prevent clumping.
If you don't mind clippings, leave them on the lawn! Clippings add extra nitrogen to the soil and decompose quickly. This natural fertilization can cut your need for extra feeding by up to 25%.
Spring Lawn Watering Best Practices
Water is the lifeblood of your lawn. Getting your watering right is key to strong roots and healthy turf. It's the final step that brings all your springtime lawn maintenance efforts to life.
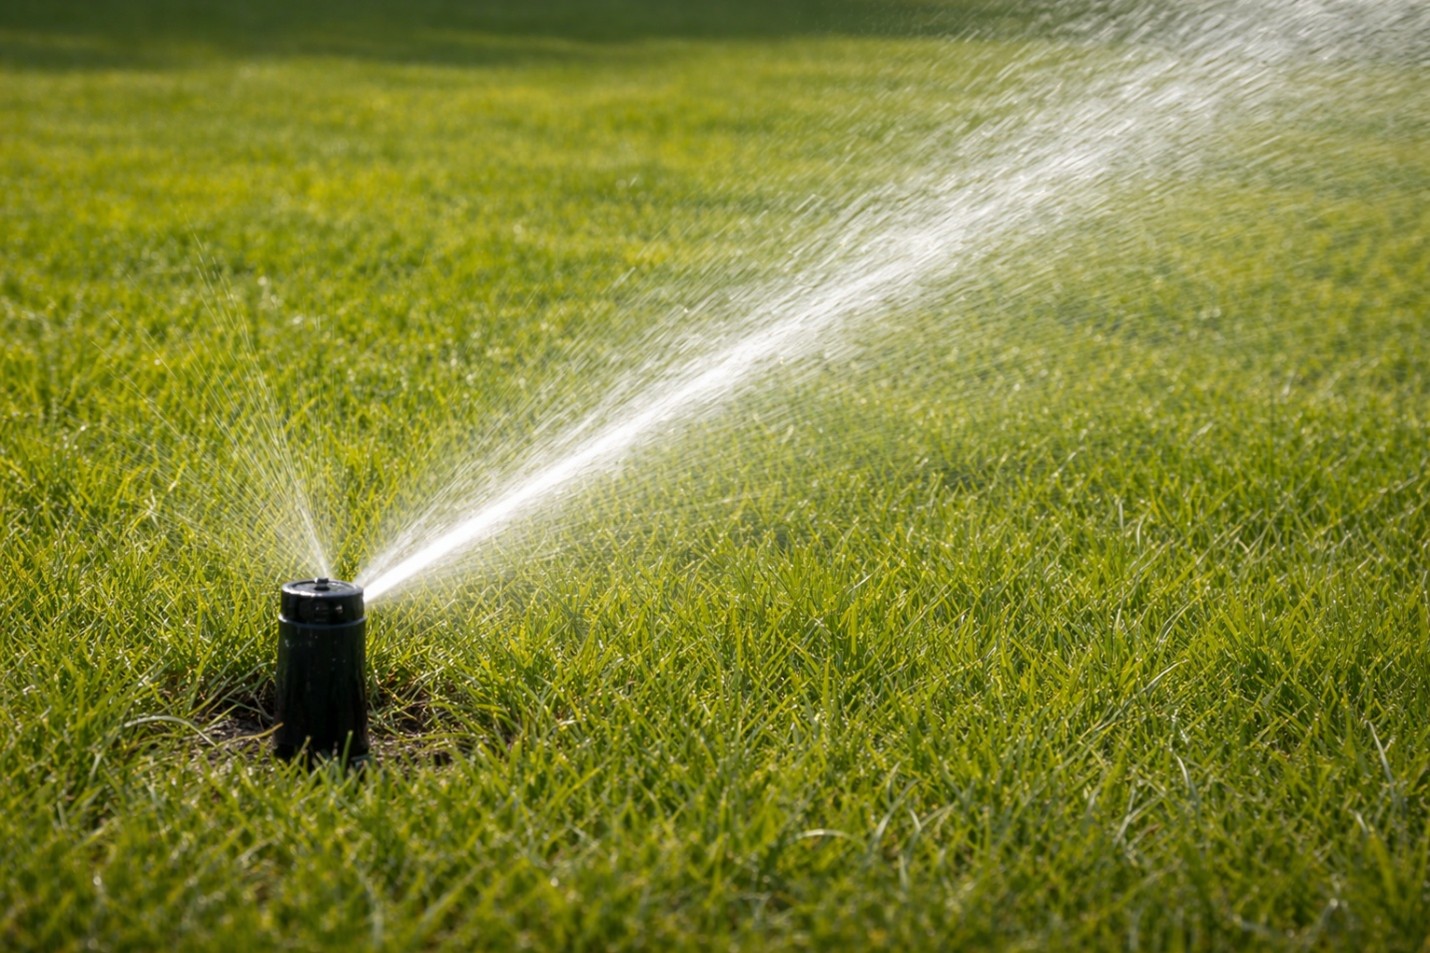
Setting Up Efficient Irrigation
Consistency is everything. Whether you use an irrigation system or a simple hose-end sprinkler, you need to be sure your lawn is receiving even coverage. Check your sprinkler heads for clogs and misalignment in April or early May, or when conditions allow. A well-tuned system prevents dry spots and wasteful runoff, giving every part of your lawn the right amount of water.
Tailoring Watering for Different Lawn Areas
Not every section of your lawn requires the same amount of water. Shady areas tend to retain moisture longer, so they often need less frequent watering or may not need to be watered at all. In contrast, spots that are in full sun or located on slopes typically dry out faster and benefit from receiving more water.
To ensure efficient use of water and promote healthy grass growth, adjust your irrigation system or watering habits to match the unique needs of each area. By directing more water to sunny and sloped sections and reducing it for shaded spots, you can help your lawn thrive while also saving money on your water bill.
To check if your sprinkler system is delivering enough water, scatter several containers around the yard, run your irrigation, and then measure how deep the water collects to see if you're reaching the goal of about one inch per week. This simple "water test" helps you adjust run times so your lawn gets the right amount of moisture without wasting water.
Proper Watering Technique: Depth and Frequency
The key guideline for lawn irrigation is to water deeply but less frequently. By doing so, you ensure that moisture penetrates the soil to a depth of approximately 6 to 8 inches. This practice stimulates the grass roots to grow downward, resulting in a stronger, deeper root system.
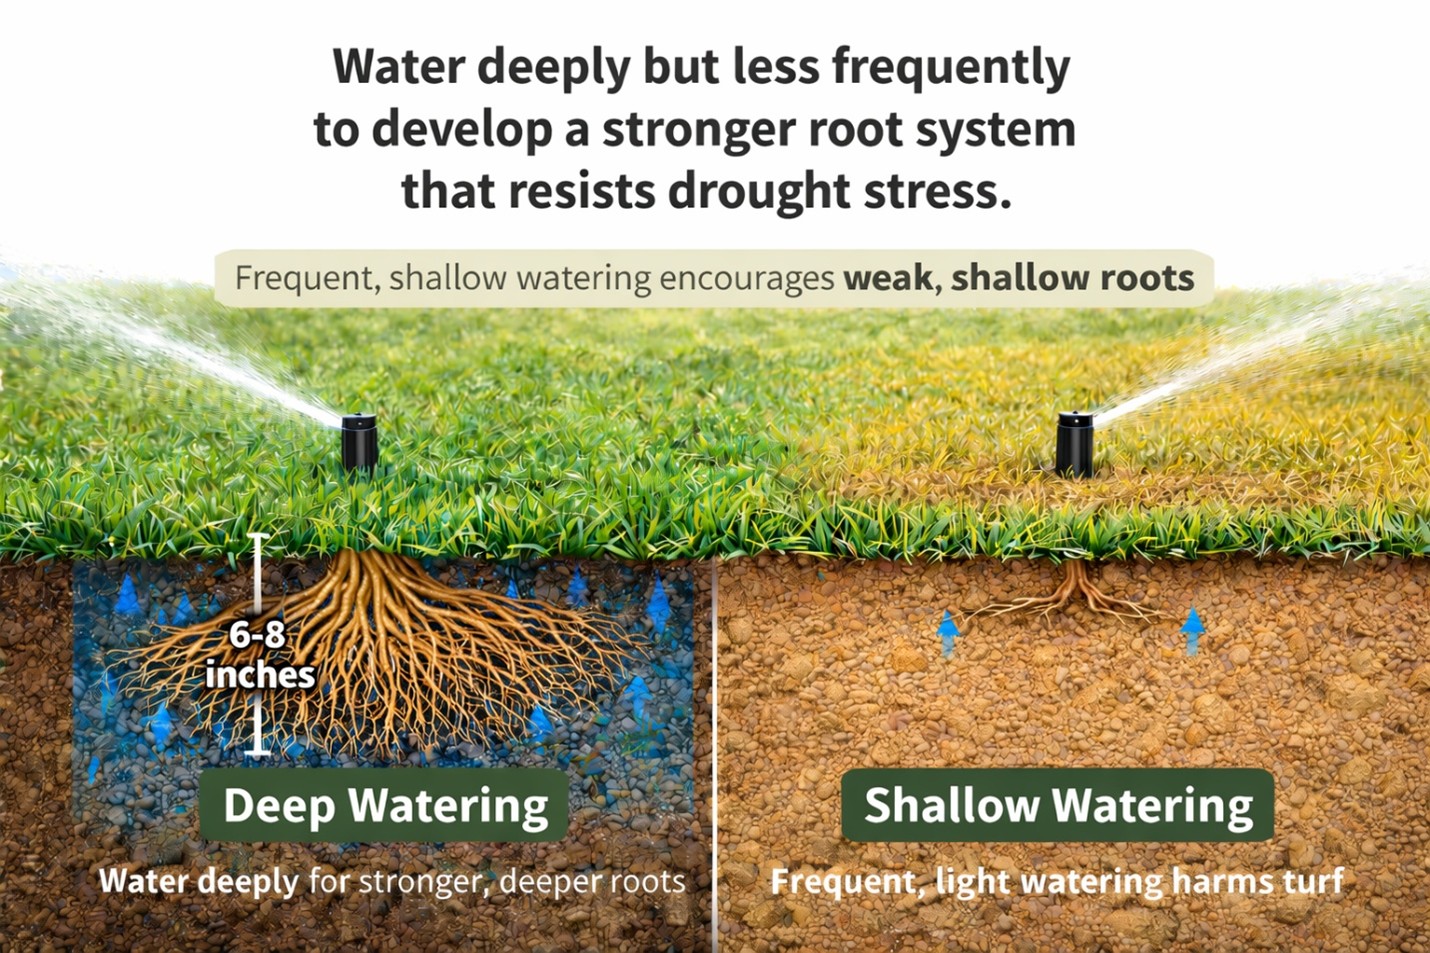
Figure 5: Deep watering creates denser root systems.
Lawns with deep roots are naturally more resilient during periods of drought, as the roots can access moisture stored further below the surface.
In contrast, shallow and frequent watering encourages roots to remain near the top layer of soil. This area dries out first, leaving the turf more vulnerable to stress from heat and lack of water. Therefore, you can maintain robust, drought-tolerant grass by prioritizing deep watering sessions over shallow ones.
If you face local water restrictions, focus on fewer, deeper watering sessions to maximize efficiency. Consider planting drought-tolerant grass types that require less water such as Turf Type Tall Fescue. This approach not only adheres to restrictions but also supports sustainable lawn care.
Signs of Overwatering and Underwatering
Your lawn will tell you if it's getting too much or too little. Learn to read the signals.
Signs of Overwatering:
- Spongy, soft turf when you walk on it.
- Excessive runoff or puddling.
- Presence of mushrooms or algae. Although mushrooms can also be a sign your soil is rich in organic matter and biological activity.
Signs of Underwatering:
- Grass blades wilt, curl, or take on a bluish-gray tint that eventually turns yellow and brown.
- Your footprints remain visible on the lawn long after you walk.
- Soil is dry and hard several inches down.
Spring Overseeding and Lawn Repair
Is your lawn thin or showing bare patches after winter? Spring overseeding can help repair damage, making your grass thicker and more resilient. This step should be a key part of your lawn care schedule.
When and How to Overseed
Timing is everything when overseeding. You must match the task to your grass type. For cool-season grasses like Kentucky bluegrass or fescue, overseed when soil temperatures reach around 55°-60°F in the spring. This allows seeds to germinate and establish roots before summer stress.
For warm season grasses like Bermuda or Zoysia, wait until late spring. Soil temperatures should be above 65°F.
The process is simple. Before you seed, mow your lawn short and rake away debris to expose the soil.
If your lawn requires extensive overseeding or a complete renovation, late summer to early fall is the best time to tackle the job. Cooler temperatures during this period help reduce stress on newly planted grass, moisture levels tend to be steadier, and natural weed activity declines, allowing seedlings a greater opportunity to become established and flourish.
For larger areas, use a core aerator or dethatcher. This opens the soil surface for better seed-to-soil contact, which is key for germination. However, don't use these devices too close to summer because they can stress the turf. You want to give your grass enough time to recover before the heat arrives.
Selecting the Proper Grass Seed
Choosing the right grass seed is essential for achieving a healthy, resilient lawn. To ensure the best results, select a seed mix tailored to both your lawn's specific needs and the local growing environment.
If you need to repair bare spots and your yard experiences varying sunlight conditions, a "sun and shade" mix is recommended. These blends are formulated to thrive in areas with both direct sunlight and partial shade.
For lawns that are predominantly shaded, opt for a blend with a higher proportion of fescue, as this grass type performs better in low-light situations. Most grass seeds require four to six hours of direct sunlight daily to grow well. However, fine fescue is more shade-tolerant and can survive with just two to four hours of sunlight.
For a uniform look, choose a pure grass seed that matches your turf type. Always check the seed label for weed content and germination rates to ensure quality.
| Grass Type | Ideal Overseeding Time | Recommended Product Type | Key Consideration |
|---|---|---|---|
| Cool-Season (Fescue, Ryegrass, Bluegrass) | Early Spring (March-April) or late summer (late August – early October) | Cool season blend or pure seed; Starter fertilizer. | Establish before summer heat and drought or apply going into the fall. |
| Warm-Season (Bermuda, Zoysia, Centipede) | Late Spring (May-Early June) | Warm-season specific seed; Patch repair products for spots. | Soil temperature must be consistently warm (>65°F). |
| Mixed or Transition Zone Lawns | Follow cool-season timing | High-quality "Sun & Shade" mix for adaptability. | Choose disease-resistant varieties for longevity. |
The Impact of Sunlight on Grass Growth
Understanding how sunlight influences your lawn is critical to maintaining healthy, resilient turf. Direct sunlight, or full sun, provides all the essential wavelengths needed for photosynthesis. This ensures that grass receives optimal energy, supporting strong blade growth and robust root systems.
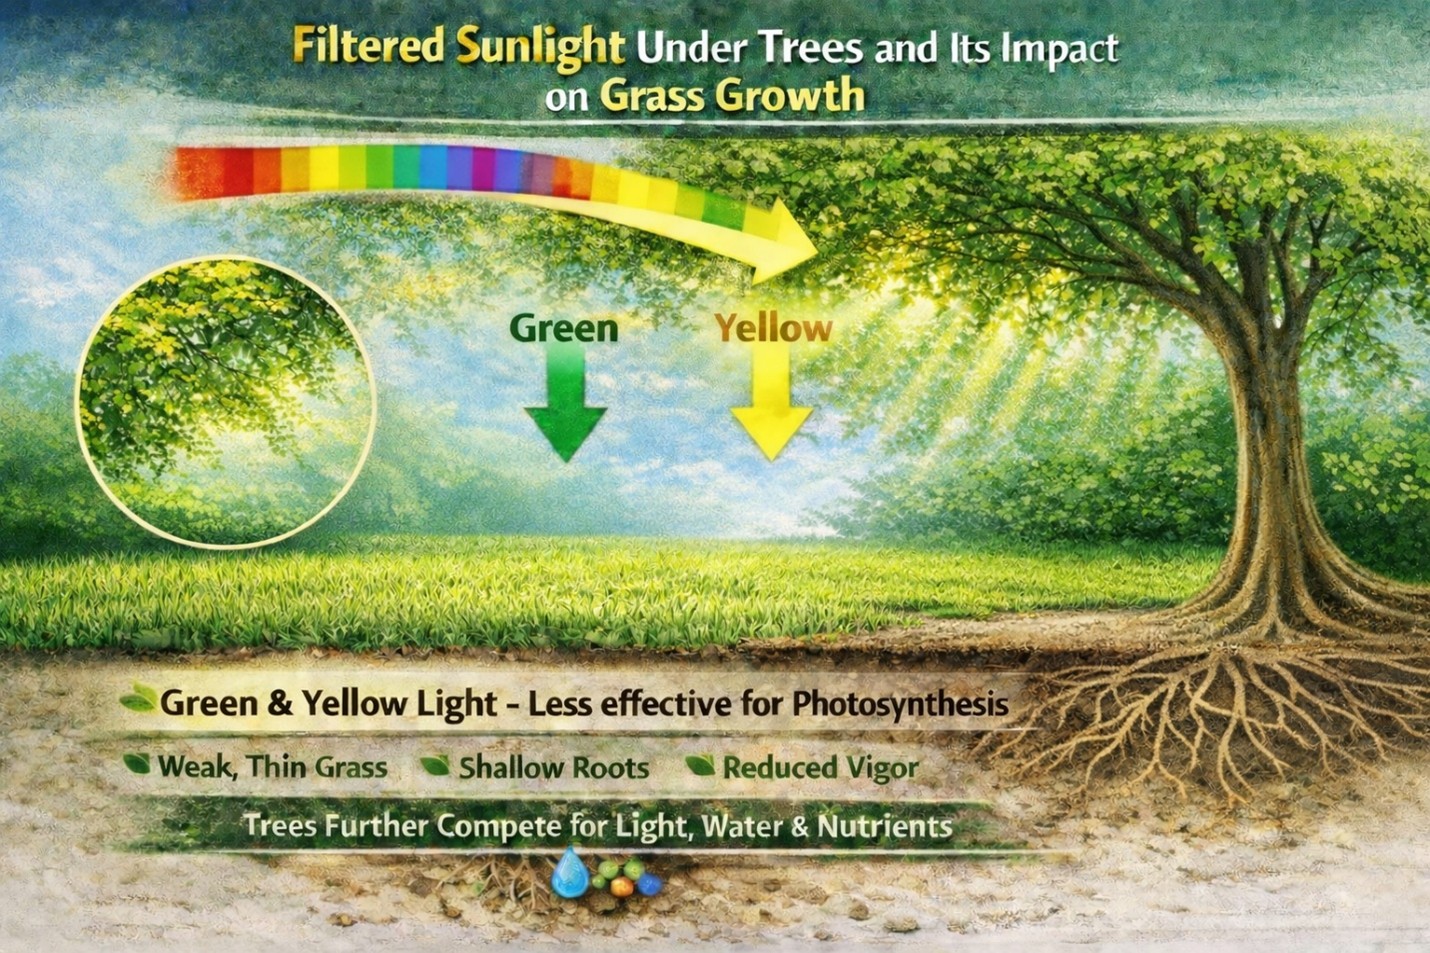
In contrast, as seen in the above image, when sunlight reaches the lawn after passing through tree canopies, it is filtered, and mostly green and yellow wavelengths penetrate to the grass below. These wavelengths are less effective for photosynthesis, which means the grass in shaded areas tends to be less lush, with weaker roots and thinner overall turf.
Additionally, trees not only reduce the amount of light reaching your lawn but also compete with grass for water and nutrients. This competition further diminishes lawn density and vigor, making it even more important to select the right seed mix and adjust care practices for shaded areas.
Post-Seeding Care
The most important step after seeding is consistent, light watering. Keep the seedbed moist but not soggy. Water seeds lightly 2–3 times daily for one to two weeks until they sprout. For more, check out this blog post that describes in detail specific steps on how to water a new lawn.
Once new grass reaches about 3 inches, you can resume normal mowing. Be gentle and ensure your mower blade is sharp. Avoid heavy traffic on seeded areas for at least a month. Hold off on applying any weed control or fertilizer until the new grass has been mowed at least 3 times and is well-established.
Essential Spring Lawn Care Tools
Having the right tools makes it easier to prepare your lawn for spring. The right equipment saves time, improves results, and helps prevent common mistakes that can damage turf. Here's what most homeowners should have on hand.
Must-Have Equipment
Every lawn starts with a core set of reliable tools. A sharp, well-maintained lawn mower is essential for making clean cuts that keep grass healthy. A sturdy leaf rake helps clear winter debris and can also be used for light dethatching to open up the turf.
To apply fertilizer and grass seed evenly, a broadcast spreader is one of the most important tools you can own. Even coverage prevents streaking, wasted product, and lawn burn while helping nutrients and seed reach the soil uniformly.
Specialty Tools Worth Investing In
Some lawns benefit from a few additional tools. A core aerator relieves soil compaction, allowing air, water, and nutrients to move down into the root zone. If your lawn has heavy thatch buildup, a dethatcher (sometimes called a power rake) can dramatically improve turf density and water absorption.
A simple soil probe is also useful for checking moisture depth and pulling soil samples. These tools help you identify issues early, before they turn into larger problems later in the season.
Maintenance Tips for Lawn Care Equipment
Your tools work hard, so show them some care. For your mower, a spring tune-up is key. Follow this checklist:
- Sharpen or replace the blade for a healthy cut.
- Change the oil and replace the air filter.
- Check the spark plug and drain old fuel.
Clean your spreader and rake after each use to prevent rust and corrosion. A little maintenance extends the life of your equipment and guarantees it's ready when you are.
FAQ
When should I start my spring lawn care routine?
Start your spring lawn care routine early to mid-March. Begin by clearing debris and preparing your mower. The exact start time varies by region and soil warmth. Wait until the ground thaws and the grass starts growing.
What is the most important first step for spring lawn upkeep?
First, remove winter debris, such as leaves and sticks. This lets sunlight and air reach your lawn. Then, test your soil.
When is the best time to apply fertilizer in the spring?
Apply fertilizer in mid-spring, around April. This is when your grass is growing fast and needs nutrients.
How do I prevent crabgrass from taking over my lawn?
Use a pre-emergent herbicide in early spring. Apply it when the soil is about 55°F for a few days. This stops crabgrass seeds from growing. Remember that the barrier is less effective in thin and bare areas of your lawn. The barrier also breaks down much quicker in hot spots, such as along driveway curbs and sidewalks.
When should I start mowing my lawn in the spring?
Start mowing when your grass is about one-third taller than its ideal height. For the first cut, set your mower to 2-3 inches. Never cut more than one-third of the blade at once.
How often and how much should I water my lawn in spring?
Water deeply but infrequently. We recommend at least 1 inch of water per week for cool-season turf. You may need to water more depending on local conditions. Water in the morning to reduce evaporation. Adjust your watering based on rainfall and watch for signs of too much or too little water.
Can I overseed my lawn in the spring to fix bare spots?
Yes, overseeding in spring is great for fixing bare spots. For cool-season grasses, early spring is best. For warm-season grass, late spring works better. Keep the soil moist until the new grass grows.
What's the difference between dethatching and aerating, and does my lawn need it?
Dethatching removes dead matter, while aeration relieves soil compaction. A light rake in spring can help with thatch. Aeration is good for root health, but only if your soil is heavy or gets a lot of foot traffic.
What are the essential tools I need for spring lawn maintenance?
You'll need a good mower, a rake, and a spreader. For bigger lawns or specific issues, consider a core aerator or dethatcher. Keep your tools in good condition.
How do I know if my lawn has a disease or a pest problem in spring?
Look for circular patches of discolored grass for diseases like snow mold. Pests like grubs can lift the grass. Proper identification is key. Improving your lawn's health through proper care is often the best defense.
Ready to Transform Your Lawn This Spring?
Our professional lawn care team can help you implement these strategies and more. Get a free estimate and let Turf Pro handle the hard work.
Get Free Estimate